Showing posts with label DIY. Show all posts

Saturday, January 14, 2017

DIY: Three Necklace Tutorials

Over Christmas break, I dedicated myself to doing a lot of little projects that had been on my list FOREVER! You saw one early, the Harry Potter Embroidery. These DIYs are necklaces that I've been meaning to make for awhile.

The first one is a button necklace and I followed a tutorial I found online here. I wanted to make this necklace for awhile because I used some of the button collection that was my grandmas before she passed away two years ago. Now it's like I have a little part of her to wear on days when I want to feel close to her. Other items I used included: felt, gold chain, needle-nose jewelers pliers, glue and a glue gun.


The second necklace DIY I did over break was one I came up with myself. I've been admiring this necklace online forever but it is not sold any more and I decided, why not try my own version!


I used the following materials:
Jewelers pliers
Leather cord
Blue beads
Bronze beads
Glue and glue gun

First step was to create the tassel, I used the leather cord and wound it back and forth on my hand. Then wrapped a smaller piece around the tassel and tacked in place with a glue gun. Then I cut the looped ends to make the tassel.

Next a strung the blue beads on to each side. I used 9 beads on each side. Pro tip: make sure to get beads that a big enough for the cord or leather cord that is small enough for the beads. I had a small problem with that and had to do some quick thinking.

I added some small bronze beads to the end as well. 

Here's how it looks when I was finished with these two steps.

 Keeping with the design on the original necklace, I put some of the bronze beads on the ends of the tassel. But you can see my tassel ends are crazy because the cord I bought came folded. So I put it under a heavy stack of books for a couple of days to help flatten it out.

Finished product! You could always add more beads or something like the little feather charm as in the original. I opted not to and I'm overall happy with this DIY.


Lastly over break, I did a necklace tutorial that you can find on the A Beautiful Mess website. I followed their directions and my necklace turned out perfectly! Thanks guys for a great tutorial.


Saturday, December 31, 2016

DIY: Harry Potter Embroidery Sampler

I've had my eye on a certain wall space in our house, right at the top of the stairs. It is a cute little space and it needs something. So I've decided to work on a couple of things in the next few months to use to style that area. The first thing that I created was an embroidery hoop with a cute flower pattern and a Harry Potter quote. Perhaps I haven't mentioned this before on this blog, but I am a GIANT Harry Potter fan! Check out HERE for the inspiration for this DIY.


As I mentioned above, I love me some HP! However, if you're unfamiliar with the movies or the books. "Always" is a beautiful quote from one of the most misunderstood characters. Severus Snape ends up with the most beautiful and heart-wrenching story line. 


I used some lightweight canvas fabric that I had lying around. I also had a small embroidery hoop, a needle, and some embroidery floss. I chose some colors that I think will look nice with the other items I am planning for this space. However, something like this can be changed to suite whatever color palette you have in your house!

After gathering my supplies, I sketched out a basic idea of what I wanted to do and got to work! I used a back stitch to create the letters. I did two rows, right beside each other so as to make the letters thicker. I'm considering going back and adding a third layer to make them stand out even more? Thoughts?

After that I added some embellishments around the outside. I wanted to keep with the embroidery sampler look from my inspiration but I also wanted to make it my own. So I came up with some vines and small flowers and some daffodil/tulip like blooms at the bottom. 


I think the final project is going to look great on my little wall space! I'll keep you posted as I add more to the area and what it looks like when I'm done!


Thursday, November 3, 2016

At Home with the Artist: DIY Moon T-Shirt

This one has been on my list for awhile! I've been wanting to make a t-shirt with the phases of the moon on it. In fact I bought the shirt for this project months ago at the thrift store and have just now gotten around to making it. I found this DIY idea on another site, but it was all in Russian! There were some good pictures and since I'm an intelligent human, I was able to figure it out :) Check out the original tutorial here if you can read Russian! To get started, make sure to measure the area of the your shirt that you would like to paint. Then grab a piece of card stock (or in my case I had to create one big enough by taping two pieces together) and decided how much space you want in between each circle. Don't forget to leave some space on the ends too for when you cut the circles out! After you know what amount of space will be taken up by the area between circles, you can use the remaining space and divide by four to get the width of your circles. Now begins the hunt for something circular in your house that is roughly that width! Good luck!


After you find your perfect circle, go ahead a trace, while measuring the appropriate space in between. When you're ready to cut, use an Exacto knife and make sure to cut on a surface that you don't mind getting a little scratched up.


Tape down the stencil you've just created to your t-shirt. Arm yourself with a sponge brush and white Acrylic paint (or fabric paint if you would rather) and get ready to paint!


I would suggest using a tapping motion with the brush, this gives it a more texture look and you're left with some areas that are more white and some that are more grey which makes them more convincing as moons. As the paint dried it became lighter, so I went back and added more white to some areas to make them brighter. I also had a little bit of trouble making the moons the same moving towards full and then coming back to full, but I think over all it looks like it should! 

Saturday, August 27, 2016

At Home with the Artist: DIY Tulle Circle Skirt

Hey all, last project of the summer! With only a couple of days left, I'm cutting it close, but I'm glad I made this one and I'm excited to wear it. I might even wear it to school, we'll see :)
In order to create this delightful tulle circle skirt, I followed the tutorial of one of my favorite blogs, A Beautiful Mess. The directions were easy to follow. I would give a couple of warnings. ABM makes it sound super easy, and it is but here are some things to watch out for:

1. Tulle is hard to keep lined up and work with, pay attention!

2. When you're sewing the layers to the elastic, ABM says to be careful to get them all at once or you'll have to redo it. When they say careful, they mean it! Make sure you get them all! I would suggest using lots of pins and keeping them there while you sew if you can.

3. Google how to hem a circle skirt correctly so you don't have a lot of pucker when you hem the lining.

4. Make sure you have an awesome pair of scissors and you cut carefully since the layers of tulle won't be hemmed, you want to make sure you don't have a raggedy edge.

Okay, I think that's all the advice I can give. Check out the process and finished piece below!

All my supplies ready to go!

Leftover wrapping paper makes perfect pattern paper!

Pinning the slippery lining to hem!

Got all 'dem layers pinned!

So pretty!

I love how full it is!

Here's the finished project on me! Too bad you can't see my adorable heals. My husband did his best at picture-taking.


Monday, August 22, 2016

What's Going on in the Classroom: DIY Hall Passes

So it's not quite the end of summer yet, one week left! However, I think (and I don't want to jinx myself here, but I think...) I'm all ready for heading back. Got a lot of curriculum work done this summer, especially in reference to Photo 1 and I'm ready to get back into the classroom and make sure supplies and decor are ready to go.
Speaking of decor, one of the things that was on my to do list this summer was to create some cool and more durable hall passes. In the past, my hall passes were just laminated pieces of paper featuring an image of the TARDIS, because yes I'm that teacher.

Let me just say, that those hall passes did not last long and I made several new ones throughout the course of the year. So to remedy that, I did some googling and I found a couple of ideas that I really liked and combined into  DIY hall passes that should (fingers crossed) last me this year and beyond. First I found the idea of using paint stirring sticks on this blog. Now this lady uses them for marking where library books go, but I thought, what a great idea for art room hall passes!


But I wanted a little more than that, so I kept looking and found this adorable set up on this Etsy Shop.

Now being as I teach high school, I didn't think I needed all the different types of passes, but I really did like the idea of hanging them up etc. So here's how I went combining these two ideas and making one of my own. 

1. I gathered up all the supplies I would need. Paint colors of choice (I ended up using purple and gold), paint brushes, masking tape, piece of medium thickness wood (found at Hobby Lobby), some paint sticks picked up for free at Lowe's and gold hooks also gotten at Lowe's. I also used Mod Podge and a black paint marker, not pictured here.


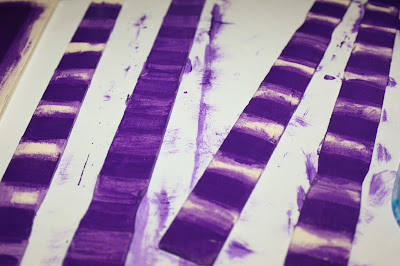
2. I knew I wanted to do stripes on the paint sticks that would become the hall passes so I used masking tape to make even stripes.


3. I painted the exposed stripes purple. Let them dry over night so I didn't remove any paint when I pulled off the tape and then painted the other areas gold.


4. Next to do the plaque that would hold the paint stick passes. I used some tape again to make an even border and painted the middle part using purple. Then I found some cool fonts on Google to use for the lettering. I liked this one because it reminded me of Harry Potter. I sketched out the letters LIGHTLY with a pencil and then painted over the pencil with gold paint and a veeeerrrry tiny brush.


5. Now in our schools hall passes have to have the room number and building on it. So I used a black paint marker and white paint to outline the words on the paint sticks. 


 6. Look at all those finished beauties! After that I drilled some holes to put ribbon in to hang the sticks and also the plaque and starter holes for the golden hooks. I also wanted to make sure that the paint didn't chip. Kids are super hard on the hall passes for some reason. So I gave them a couple of coats of Mod Podge for good measure.


And tada! Finished product! I'm super happy with the way it looks and how I was able to combine the ideas I found online to create something unique for our room, and I hope also durable! Here's to a new school year! 7 days and counting!


Wednesday, August 3, 2016

At Home with the Artist: DIY Basket and Rug with T-Shirts!

I've been wanting a rug for our bedroom for awhile, but rugs are so expensive! So when I found that my husband had several boxes of old t shirts stashed at my in-laws and they were trying to get rid of them, I of course took them right away!

The first tutorials I followed to make a rug with t shirts can be found here and here. In the tutorial, they want on and on about keeping everything lose so that it won't become a basket instead of a rug. Man is it true! Good luck! Mine went a little bit like this:


I got about this far before I had to admit that I was making a basket instead of a rug. I sewed and picked out the stitches three times and I still had a basket at the end of that last attempt. So I went with it, finished it up and now have a cute basket for things under my easel.


But I still wanted to make that rug! So I followed a different tutorial found on one of my favorite blogs, A Beautiful Mess. This project only involved weaving and no braiding or sewing. Instead of using sheeting like they suggest, I used t-shirt material since I still had so much of it. 

Marked off the board as suggest.

Strung large pieces of cut up t-shirts onto my 'loom'.

Began weaving with another t-shirt string.

 Almost done weaving the whole rug!

Tying off the ends.

Look at the finished rug at the end of our bed! Some day I would like to make a larger one for the office, but I think with the multiple tries for the first one and then this one, I'm all rugged out for awhile!