Showing posts with label watercolor paints. Show all posts

Monday, May 16, 2016

A Peak Inside my Portfolio- Watercolor Birds

So you guessed it, if I'm doing an animal painting, it's probably for my brother! And you're right! for his birthday this year, he wanted a series of birds that he worked with in the Asia section of the zoo. If you want to see more animal paintings that I've done for my bro, you can look here, here, here or here! Check out these sketches turned into final products.


Finished Derbyan Parakeet


Completed Chinese Hwamei


Azure Winged Magpie


Golden Pheasant


Tuesday, February 23, 2016

What's Going on in the Classroom- Mixed Media Paintings

Have I mentioned that I love our painting unit? Not only are students sitting quietly and working hard, but they are producing some amazing images! After creating a watercolor composition, we moved into mixed media pieces. For this piece I limited the subject matter a little bit. Each student had to incorporate hand into their mixed media composition. That hand had to be interacting with an object or item. So it was somewhat limited, but the object or item and how the hand interacts with it is up to the student to decide. We spent some time taking our own reference pictures of hands with objects and then we practiced how to draw a hand. I made up a little worksheet to get them started, it looks something like this...


After this basic intro to figure drawing, we talked about how to draw the different hand positions that each student wanted to use. This was mostly done individually between myself and each student. The steps after this were to draw the hand and object lightly with pencil on illustration board and then do light watercolor washes of basic colors to fill in the image. Then student could the choose to use oil pastels, chalk pastels, and/or colored pencils to had shading (depth) and details to their image. Here is what we have so far... we're spending the rest of the week on it as well so these aren't quite done yet.

Practice drawings and sketching out the final image


Finally starting to do some painting!


Wednesday, February 3, 2016

What's Going on in the Classroom: Watercolor Painting Project

I'm soooo glad we have moved back into a two-dimensional media! This quarter students will be exploring painting and some 2-D mixed media as well as printmaking and computer graphics. We've started off with watercolor painting. As we enter the second half of the year, students are really striking out with their own voice and ideas. So for this painting, instead of telling students what their subject matter should be, we are focusing on their composition or how they arrange that subject matter. But before we got into any of that, we practice and played around with different watercolor techniques. Students learned how to do a watercolor wash and some different textures with salt and straws, etc.. then they tried their hand at painting realistically with some fruit as their inspiration.


Now students are beginning their compositions. The chose any subject matter they wanted, however they had to include one distinct focal point. Students had to place that focal point on their paper according to the Rule of Thirds. Then they were required to incorporate a watercolor wash and a texture technique somewhere in their work. Here are a few that are just getting starting. More finished pieces to come!


Monday, November 30, 2015

What's Going on in the Classroom: Hand Coloring Photographs

I'm hopeful that everyone's Thanksgiving was amazing and the break was a much-needed breather from the joys of teaching. My photography students just finished experimenting with hand coloring their photographs. We used fiber-based paper instead of RC paper and students used a rigorous washing process to make sure the chemicals completely left the fiber based paper.

After the print was developed and washed students put it in a blotting book for 24 hours and then used the hot press to remove any remaining moisture. Then they were ready to color! We practiced using water colors and colored pencils and I encouraged students to chose one area that would complement their idea or concepts with the photo that they took. Here are a couple of examples, these are black and white film prints that have been hand colored:


Friday, April 24, 2015

Claude Monet- Impressionism in 3rd Grade

Hello all!
It's been awhile, and I can only pin it down to the end of the school year. There are so many field trips and assemblies and testing, which for the art room means tracking down students to have them make up and finish projects. It also means end of the year graduation projects and grades and observations by principles! Ah! Not to mention trying to teach everything before you run out of time!

Here's a little peak into what is going on in the art room. Our third grade students are studying Claude Monet and Impressionism. We talked about lot about Monet's life and work. We also discussed the common themes in Impressionist paintings; i.e. light, fleeting moments of time, short brush strokes, color...

Now I know the traditional Impressionist project for elementary in the waterlilies with the bridge and sit tight, because I will get to that! But we started with Monet's House of Parliament.


With that as a jumping off point, each student selected a famous building that they wanted to use and did a drawing of it. Then we used watercolor to paint the building a dark color and the background colorful with lots of light.


The Impressionist piece came in when we used chalk pastels in the background only! To create the small brushstrokes so common in Impressionist painting. I told students they could use whatever colors they wanted, but they had to use small marks and all the marks had to go in the same direction.


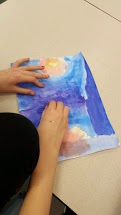
Now that those pieces are finished, I wanted to push students to use their paint brushes like they would, if they were Impressionist painters. Now we're getting to the good old waterlilies and bridge!


First we taped of the bridge using masking tape. We talked about how this would protect the paper and we could go back later, take the tape off and have a wonderful bridge to design.
Then students used mostly cool colors, with a little bit of yellow here and there and short brush strokes!! The technique for each student varied, but the look of these Impressionist paintings is great! Stay tuned for the finished project.


Friday, December 19, 2014

Feelings and Color

In our art curriculum, we are required to talk about showing feeling through color. I love this concept! The kids really latch onto it and it makes sense to them. For this project, we had a conversation about how different colors can make you feel or how we associated different colors with different feelings. We made sure to talk about how people can think about colors differently and perhaps some colors can show more than one feeling. Then I showed them examples of paintings of musical instruments. We followed that up with some good old graphite drawing! Pictures of musical instruments were passed out and students picked one to use as inspiration for their drawing.


As you can see, we have some amazing artists in our fourth grade classes! Then we moved on to the part of the project that I think makes it so interesting and exciting for kids. The students had to pick out a song, any song as long as it was school appropriate. Then they listened to it and decided what feelings the song made them feel. I had the kids do this as homework, I didn't want to have to listen to all those songs!
The kids came back with songs and the feelings that those songs inspired and we worked through what colors they should use. They loved this process, they were so geeked to choose a song and decided how to represent the feelings with color.

We broke out the watercolor paints and got to work after a brief talk about where to place color so that they instrument didn't become part of the background and it was really the focal point, and stood out, etc...


Most students finished the background in the first class, some even finished the background and the instrument. For those that had both done, the next step was to highlight the instrument even more. We used oil pastels on the instrument only, to make it pop out of the background. We talked about many ways to do that (coloring it all in, using designs and patterns, outlining etc..) 
What I like most about the finished products is that the effects are so varied, but you can tell that there is real feeling behind the colors and the way these pieces were painted.