Wednesday, May 20, 2015

Printmaking: For all Grades!

As the school year winds down, the challenge for me is to have projects that students can complete by the end of school. With class picnics, parties, field trips, and kids just being absent for whatever reason, it's not always a good idea to start long projects.
One thing that I know we can do in one or two class periods, is printmaking! Specifically in this post I'll show mono printing with 1st grade students and chalk prints with 4th grade students.

For monoprints, I have some plexi glass sheets that I set up with paint into stations for the kids. We either watch a short video or I demo how to create designs using whatever tools we have sitting out. We talk about how to make a monoprint by laying the paper on top of the design and pressing down. We also talk about and the kids make a ghost print right after their first print. This way they usually get at least one successful print! While kids are waiting for their turn at a printmaking station, they can free create, but also should be thinking about what their design is going to be.


Chalk prints are a little different, although I would still label them as a monoprint. For this project, we involve stencils. Not gonna lie, I got this idea from Cassie Stephens, check her out here. Again, I set up stations, but this time, instead of a paint covered plate, it's a shallow tub of water. 
I demo the process to students and then they head back to their seats to put their names on their paper and cut out shapes to be their stencils. We talk briefly about how simple shapes are more successful, but there's always someone who tries letters which have to be done backwards. It's a hot mess!
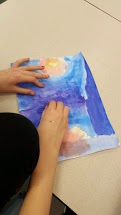
When students are ready, they come up to a station of water. With scissors, they scrape off a layer of chalk right onto the water. The water holds the chalk on the surface. When they have the color coverage that they want, they lay down the shapes that they cut out and then their piece of paper on top. This part is tricky! They have to just tap the paper lightly with their fingers to pick up the chalk from the surface of the water. They should NOT push the paper down so that it's submerged. After they've tapped all over the paper, they lift it up and viola! A wonderful chalk print!
While kids are waiting for their turn, they can be cutting out new stencils and preparing their paper. 


Friday, April 24, 2015

Claude Monet- Impressionism in 3rd Grade

Hello all!
It's been awhile, and I can only pin it down to the end of the school year. There are so many field trips and assemblies and testing, which for the art room means tracking down students to have them make up and finish projects. It also means end of the year graduation projects and grades and observations by principles! Ah! Not to mention trying to teach everything before you run out of time!

Here's a little peak into what is going on in the art room. Our third grade students are studying Claude Monet and Impressionism. We talked about lot about Monet's life and work. We also discussed the common themes in Impressionist paintings; i.e. light, fleeting moments of time, short brush strokes, color...

Now I know the traditional Impressionist project for elementary in the waterlilies with the bridge and sit tight, because I will get to that! But we started with Monet's House of Parliament.


With that as a jumping off point, each student selected a famous building that they wanted to use and did a drawing of it. Then we used watercolor to paint the building a dark color and the background colorful with lots of light.


The Impressionist piece came in when we used chalk pastels in the background only! To create the small brushstrokes so common in Impressionist painting. I told students they could use whatever colors they wanted, but they had to use small marks and all the marks had to go in the same direction.


Now that those pieces are finished, I wanted to push students to use their paint brushes like they would, if they were Impressionist painters. Now we're getting to the good old waterlilies and bridge!


First we taped of the bridge using masking tape. We talked about how this would protect the paper and we could go back later, take the tape off and have a wonderful bridge to design.
Then students used mostly cool colors, with a little bit of yellow here and there and short brush strokes!! The technique for each student varied, but the look of these Impressionist paintings is great! Stay tuned for the finished project.


Thursday, March 26, 2015

DIY- Around the House and Classroom

In an effort to decorate my new house and new classroom, I have been scouring Pinterest and the inter-webs for ideas. The two places in my house I wanted to hang things and decorate were the open wall in our living room (chocolate brown and blues for the living room color scheme) and the wall along our stairway to the upstairs (which I decided to use black and silver with green accents).

My husband and I are huge Dr. Who fans so we have a lot of The Doctor paraphernalia that we wanted to hang up, (including a huge painting of the Tardis on canvas DIY by me!) which went perfectly with the blues in the living room! We also hung a couple pieces of artwork that we had received at our wedding. After I had hung all this up, there was a small area that I wasn't happy was empty. So I quick painted up a bluish, grey image with a plane landing. My husband is a pilot and all so I knew he's be on board with the plane motif. Here's what our finished living room wall display looks like:


The stairway was another story. I had quite the struggle deciding what to hang and I really wanted to go in a lot of different directions. Finally I had to sit myself down and edit. The main piece in this collage of frames was the guest book from our wedding. I loved the black and silver and so decided to carry on that scheme. I came up with some DIY Rorschach prints in green frames that I had lying around. I also used foam core and metallic spray paint to create DIY monogram letters. Then we had a canvas print of us on our wedding day that our photographer gave us. Luckily, there was a very strong green vibe to the print in the form of a healthy vine. Lastly, I added our personalized doorknocker (also a gift) that we can not currently put on our door, but that looks great on the wall! Here is our finished stairway wall decor:


And not to neglect my classroom! I have a ton of windows, but unfortunately I cannot enjoy the natural light and sunshine that we are now starting to see a little of! Why is this you ask? Because my windows all face the playground. There are always classes outside for recess or whatnot and students that I have in class are completely distracted. So the other day I unearthed some psychedelic fabric that I convinced my mom to buy me in high school and I thought, this will make great curtains!


All I did was hem and top stitch around the side and then bring the top edge down 5 inches and sewed and the very end of the sheet to create a tube to slide the rod through.


Thankfully, my PTO is covering the costs of the rods! I used inexpensive white tension rods which can be found at Target for under $5.00. Now the curtains cover the students view of the outside, but I can pull the blinds all the way up to the top and let in the light nearer to the ceiling and no one is distracted! Check them out!


Monday, March 23, 2015

The Art of Ancient Egypt

What's better than Art of Ancient Egypt? Nothing! Second grade had a whole unit on art from the Middle East and ancient Egypt was by far their favorite. We started off with a presentation about Egypt, including all the awesome, gory details about mummies and tombs and all the good stuff. Then we played an interactive game on the Smartboard that can be found here, where you actually explore a tomb and have to solve problems to get to different parts of your underground exploration. This really set the tone for an awesome lesson because the kids were pumped. We made ancient Egyptian landscapes with repousse metal doors as our Egyptian-inspired art project. I originally got the idea from this site here, but modified it for our class.

Our first day of art making included drawing pyramids and other details onto our landscape and then coloring with colored pencils. We practiced adding all kinds of texture, like bricks and shadows for the sand. They could do a night time or day time scene. It was all great work!


Then we busted out the metal. I used a lightweight piece of sheet metal for each student. I cut them to be the same size as the paper they had just drawn their landscape on. We talked about how to treat the metal and be safe. Then I demonstrated how to use a pointed wooden tool to etch into the metal any designs the students wanted. I had up examples of hieroglyphics (which we had talked about during our first class) that I encouraged the students to use to spell out messages or just use the ones they thought looked cool.


The last step of this project was to cut the doors in half and glue onto each side of the landscape. Then we glued that whole unit onto a new piece of paper and decorated our 'background' with a striped pattern. When they're all hung up and open to see both the doors and landscape inside, they look awesome!


Wednesday, March 4, 2015

Paper Weaving with Young Students

Each year, students do some sort of fiber arts project. With the older students, I do patterns inside of tabby weaving and make pouches, we also do simple sewing. However, those projects don't go very smoothly in less the students already have a foundation in weaving skills and techniques. We start in kindergarten and first grade with paper weaving. It's a cheap option and doesn't take as long as the yarn weaving. It also helps the students that still need to develop fine motor skills because they're using large strips of paper.

For first grade this year, we are combining weaving and collage-making to create a house! I originally saw this idea on one of my favorite blogs, Painted Paper! However, she originally found the idea on Pinterest.

We started by measuring and cutting our looms. I had the students use the ruler to make their lines. We did simple measuring using the width of the ruler as our guide. Then we cut the lines, making sure not to go too far! This took one class period. We went slowly and made sure everyone got it right. During the second class, we wove strips of paper into our loom and glued down the edges. This also took a whole class period because students have only done this once before in kindergarten. However, I have done this with first graders who did not do paper weaving in kindergarten and I have to tell you, it goes much faster if they have already tried it once!


During the third and fourth classes, we talked about collages and how to make them. We also looked at some examples. Then students glued their weaving to a piece of blue paper and begin collaging their house using scrap paper. I left it up to them as to what details their house would have. Let me tell you, some of those bad boys had pools and diving boards and the works! After this, the students were given paint choices as well as paint brushes and sponges. They added texture and details that they could not create with paper. The finished results are colorful and interesting and totally unique!


Tuesday, February 17, 2015

Clay Project- Gnomes!

I have to thank my art teacher friend Mike for this one! A clay project for elementary students that combines; slab-making, molds, slip and score, additive sculpture, and glazing. My fourth grade students are making clay gnomes, although some have decided to turn them into wizards, which is perfectly okay with me being a wizard fan myself.
During the first class, we discussed air pockets and the clay drying process. Then we wedged out the clay and threw it to make a slab. The students then wrapped that slab around a paper-towel covered cone and smudged the edges together. Then a small amount of water could be used to pull the top of the clay out so that it created a steep point that will eventually be the hat of the gnome/wizard.


During the next two classes, students were able to add whatever details they liked to their creations. We simply reviewed how to score and slip to attach pieces of clay together. Students also had to use facial features on their gnome/wizard to demonstrate a mood. We talked about that a little bit, and the kids got started creating some of the most interesting creatures!


On a more personal note, some of my art teacher friends came over to my house to paint wallets. Apparently, you can paint with acrylic paint on leather or faux-leather wallets. I purchased mine at the thrift store. I finished this one just yesterday, sadly I only have two pictures of it, not many in-progress. I hope to create another one as well. This one just needs to be sealed with a clear acrylic sealer.


Thursday, February 5, 2015

Learning about Asian Art

All my classes are venturing in to the realm of art from other cultures. It's so interesting to hear the dialogue and have discussions about student's thoughts on this art. Some art from other places in the world is so different than what we typically think of as art. It's fun to learn the differences and also to learn about what art looked like in ancient times.

First grade students learn about art from ancient Asian and we are smack dab in the middle of all that learning. We talked first about the art of ancient Japan and we learned about Gyotaku which is the art of fish printing. There's a great video here that talks about where the tradition came from. We used rubber fish and painted on them with tempera paint. Then placed paper of top and rubbed them. During the next class, students glued their piece to a colorful background and decorated the border. Then we learned how to write our names in Japanese and the students signed their name with red paint, just like a traditional Han or Hanko stamp.


To explore the ancient art of Asian even further, we moved into talking about China. We talked about the emperors and how their families would rule for years and their last names were very famous. We talked specifically about the Ming family and all the contributions they made to China, including the Great Wall and Ming Vases. Our project was to draw, color and decorate three Ming Vases. Students drew a small, medium, and large vase. Then we colored them in using only blue oil pastel and then painted over them using white tempera paint. Because of course, Ming Vases are all blue and white! Then students used pointy sticks to etch out designs through the white paint, down to the blue oil pastel. They cut out their finished vases and glued them onto pink paper. During our last class, we painted black bamboo shoots coming out of the Ming Vases and then they wrote their names in Chinese using Sharpie markers. The results are awesome! We loved learning about Asian art!