Tuesday, December 17, 2013

Writing computer code in the art room?

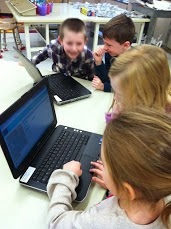
Last week, I had two of my first grade classes participate in The Hour Of Code (http://csedweek.org/). I have to admit I only did it because they were offering free storage space on Drop Box which can totally come in handy.
But as the kids were working, I saw some other benefits. They were really problem solving. The conversations were great. I had them partner up and work at laptops and those kids were discussing different ways they could program the bird to get the pig. they were really great thinking conversations.
 
Art is all about thinking and solving problems and so I thought, what a great connection! So after they were done, we had a little conversation about how being an artist doesn't mean you have to paint or draw. Being an artist means being creative. We talked about how they were creative when they were trying to come up with unique ways to solve their programming problems.
We came to the conclusion in the end that no matter what you end up doing when you grow up, if you are thinking creatively then you are using your artistic skills.


So even though I did Hour of Code for selfish reasons, it ended up being a great lesson for my kids!

Monday, December 9, 2013

Clay!

I missed a week of posting! Last week was crazy! I was out for a couple of days because I am participating in a professional learning cohort on 21st Century Learners and Education. Hopefully as that research develops I will be posting more about it. But for now, suffice it to say that it kept me busy last week and I wasn't able to post.

Maybe it's insane of me but the 4th grade classes are doing pinch pot bowls and spoons out of clay before Christmas break! We are attempting to have them all done by then so that they can dry out and I can fire them before the students get back in January. Then students can take their time glazing their pieces. I wanted to do these classes early to also have time to do clay with other grades depending on the supplies we have left.
 
So last week we had a day where we talked about the basic terms involved in making things with clay. Firing, Leather Hard, Bone Dry, Coil, Pinch, Slab etc... click here for an awesome worksheet to hand out to students. We learned about the tools of a ceramicist: loop tool, clay knife, wire tool, rib etc... and also we looked at some non-traditional tools that could be used such as a comb or a fork or material. We also took a mini tour of the kiln so that everyone knew what it looks like and what it does. Then students spent the second half of class simply experiencing the medium. The excitement in the room was inspiring! I don't have to work very hard to get everyone pumped up about making things out of clay.

This week students are going to be making the spoons. And then next week they will make bowls. Their only guidelines are it has to be in a pinch pot style and they must use texture of some kind and the bowl and the spoon have to obviously belong together. They can make that connection however they want; similar style, texture or coloring.


On a side note, I was asked to hang some of our fabulous student artwork up in the administration building. It looks great! Here some of the photos:


Monday, November 25, 2013

Hubble Space Telescope: There is color in space!

I want kids to be excited about color. I think color is one of the most exciting elements of art and it can be used to create so many different effects in a student's artwork. Color is all around us, we think clouds are white  but really they are full of greys and purples and yellows and blues and greens. We think the water is blue but it's not, it's full of all sorts of colors and reflections.

In second grade we talked about space and the color that is in space. We discussed the colors that we see when we look at space, and how it seems to be only a couple of colors. Then we talked about the Hubble Space Telescope. We looked at pictures of it and discovered how it worked. ( Hubble Space Telescope website) But what we really spent time looking at was the pictures that it sends back to Earth. Man these pictures have some great color! (Video of Hubble Pictures) This project inspiration came from this blog, check it out! makeitawonderfullife.blogspot.com


The students practiced using chalk pastels. They practiced several techniques that I demonstrated (blending colors together, putting colors on top of each other, making the edges of shapes fuzzy, and using scrap paper to mask an area of their artwork.) and they also just plain got comfortable with the medium.


On the second day of this project, I had several pictures taken from the Hubble Telescope. Again I did a demo to show students how  one of those pictures would translate into a chalk pastel drawing. We discussed how my picture didn't look exactly like the Hubble Telescope pictures and that was okay because we were just using the pictures as inspiration (where we get ideas) rather than trying to copy them. Students went to town and boy did a lot of them turn out great! What an awesome project to explore color. The students were so excited to learn all about how the telescope worked and they really got into the idea of color in space. I loved this project, easy and inspiring and definitely full of color!

Monday, November 18, 2013

Colors!

Kindergarten students are learning all about Primary and Secondary Colors!
We spent three days for each class on a Primary Color. We had Yellow Day, Red Day, and Blue Day. We painted using each color, after brainstorming a list of things that were each color. The kids had a lot of fun and it helped with really getting them used to the procedure for painting.

Then we started talking about Secondary Colors and this is the part I really want to talk about today because the kids just had a blast! I wanted them to watch Secondary Color mixing happen and in several different ways, not just mixing paint or coloring them. So we did Secondary Color Handshakes and we did Secondary Color Cookies.

For the handshakes, each student got to put a Primary Color on their hand and then go find someone who's hand was a different color and shake hands so that the colors mixed together. We surprisingly had very little mess. They loved how it felt and how it looked.


For the cookies, each student got their own graham crackers and red, yellow, and blue frosting and we mixed our frostings on our cookies to make orange, green, and violet cookies. Not only did they look cool, but they tasted great. The hope is they will remember that lesson for awhile!


Monday, November 11, 2013

Everyone loves Grumpy Cat!

We're easing our way into color. The 4th graders are doing an awesome project this year! They are studying Pop Art. We learned that Pop Art involves (among other things); lots of color and images that are popular at the time the artwork is made. We took a look into the life of one of the most famous Pop Artists, Andy Warhol. There's are great little music video about his life and Pop Art that we used (found here). **Warning, it does contain a Justin Bieber song that caused some uproar in my class, both positive and negative.**

 
Then we looked at Grumpy Cat memes. If you haven't seen Grumpy Cat yet, you need to click here to check him out. Some of the memes are inappropriate, but I found several that I could show the kids and we could get a good laugh out of it. Many students recognized him and had other examples to share with the class. We discussed how Grumpy Cat is a popular icon in today's world. Then I showed them the Marilyn Monroe piece that Andy Warhol did with multiple drawings of Marilyn, each colored a differently and explained that we would be doing this with Grumpy Cat.
We then spent two class periods dividing our paper into four equal squares and drawing our Grumpy Cats (directions courtesy of Kathy Barbro). During the second class, we took a break to review what we knew about the color wheel and Primary and Secondary colors. Then we talked about color schemes. We focused on Monochromatic, Analogous, and Complementary color schemes. Students were instructed that each cat had to feature a different color scheme that they had just learned. The fourth cat could be colored whatever they want. We're still in the process of finishing these. I will post some of the finished product next week!

 
In other news, our first grade students finished their Louise Nevelson sculptures and they look awesome! Check them out!


Monday, November 4, 2013

Louise Nevelson Assemblage Sculptures

As we continue looking at shapes, the first grade students are digging a little deeper than just circle, square, and triangle. We started talking about how other shapes, maybe shapes without names could be a part of our artwork. We talked about what a sculpture was and what it means to make an assemblage. In order to look at all of these things, we framed the lesson by learning about famous sculpture artist Louise Nevelson. I found a great PowerPoint online (click here) which I just edited a little bit for our purposes. Then we used this great Smart board activity (found here) to practice placing found objects in our assemblages and how they should lay close to one another, fill up the space, and may even overlap or go off the page!


Then students began the gluing. I had a lot of wooden shapes from previous art teachers and someone donated a bunch of Styrofoam pieces. I thought, what a perfect time to have these donated! The kids are still in the process of gluing down their found objects. I'll be sure to post a follow up to these awesome Louise Nevelson-inspired assemblage sculptures!


Monday, October 28, 2013

Shapes!

The first thing I wanted to do with shapes this year is to have the younger students cut them out! Not only are they studying shapes are learning about them for the first time, but they can also use this time to develop their fine motor skills. Many kindergarten and even first grade students do not know how to hold scissors correctly or control paper and scissors together in order to cut out squares, circles and triangles.
Both kindergarten and 1st grade students practiced cutting this year. They did squares and triangles on their own with only a small amount of guidance on how to hold the scissors and how to turn their paper. For circles I had copied paper with circles drawn on them so that the students could follow the lines. For circles we also talked about how to hold your scissors and turn your paper for better results.
As you can imagine we then had a ton of cut out shapes! What to do!?


The first grade students turned theirs into name tags. They simply glued shapes on to their name (pre-written) on a black piece of paper and then I laminated them.


The kinders used their shapes to decorate stuffed paper bags and turn them into houses! They had a blast and got very imaginative. The houses turned out awesome!


Monday, October 21, 2013

Landscapes... another Visible Thinking Strategy! (Also an update on 4th Grade)

So we're talking about Shapes now! And we're using Shapes to do all sorts of things from cutting them out to drawing people with them. The second grade class is going to draw a landscape using shapes. But first I wanted to see how much they remembered from 1st grade about landscapes. So we talked briefly about what remembered about landscapes and what a landscape included. In every class someone brought up foreground, middle ground, and background! Success!! They must have learned well last year. We talked about that a little more in depth. Then to get everyone really focused we did a Visible Thinking Strategy called See, Think, Wonder.


Students did this in table groups with one writer per table but everyone sharing ideas. They looked at a piece by Thomas Cole called The Oxbow and wrote down what they saw, what they thought about, and what they wondered about as they viewed this piece. Here are some of the results:


Also an update on 4th grade perspective relief sculptures, they turned out so well! Here are a few of the finished product.


Monday, October 14, 2013

Visible Thinking

At our elementary school, we use a Visible Thinking Initiative. This is a framework that we use to focus on the individual student as well as the collective thinking and collaboration of the entire class. It really shows students and teachers a tangible view of students’ thinking. and it helps to uncover misconceptions, prior knowledge, reasoning ability, and degrees of understanding. To read more about Visible Thinking Strategies click HERE


In the art room, we used a strategy called Chalk Talk to learn about shapes with the kindergarten and 1st grade students. Each table in the room had a laminated sheet of paper on it, with a certain shape drawn at the top. Students spent the one entire class period rotating around the room and adding a drawing to each paper. The catch? They could only draw using the shape at the top of the paper. The could only add to what was already present, not erase anything that anyone else had drawn, even if the paper got a little full. This was a great way for everyone to participate and work together and to introduce shapes. But also it really served as a tool for me to observe my students drawing a basic element of art and have the time to take note of which students will need assistance in learning to better draw their shapes. Killing two birds with one stone and what's more the kids really liked doing it and seeing the results!


Monday, October 7, 2013

One-Point Perspective Relief Sculptures

Last year, 3rd grade students were introduced to One-Point Perspective. They struggled a bit but I think most of them caught on in the end. So this year I wanted to revisit the concept and have them solidify their understanding and I wanted to make it a little crazy and different. So I found this high school project for inspiration. Our pieces are still works in progress, but if they turn out half as good as the example, I'll be happy! Check out the inspiration HERE

So first we reviewed how to use a ruler and draw straight lines with a ruler. You'd be surprised how many 4th graders can't do that correctly without the ruler moving or their pencil straying from the edge! Then we practiced drawing shapes in One-Point Perspective. (Or 3-D shapes as they like to call them). Then each student was given a piece of card stock and then had to draw five or more shapes around one Vanishing Point and then draw the Orthogonal Lines to connect to that Vanishing Point from each shape.


After this was done, we glued the pieces onto pieces of cardboard from cereal boxes and then cut them out and painted them. We talked about using three different colors; light, medium and dark, and that they should put the lightest color on the shapes themselves and the other colors on the sides (some students listened and some didn't). In hindsight, I think I would have the students paint them before cutting them out that way if they paint outside their lines it gets on the extra cardboard and is cut away instead of getting it all over the table.


This is the step my students are just finishing up. But after this they will collage a background on to scraps of matte board, using similar color strips from magazines and the create a relief sculpture by attaching 'nubs' (we're calling them) to the back of their shapes so that they will be raised off of their background. We're excited to see how they turn out, I'll make sure to post the finished product when we're done!

Monday, September 30, 2013

Dragons- Made of lines and breathing fire!


As we wrap up September, we're also wrapping up our unit on Line. All grade levels did several projects on line and the kids are ready to move on. I'm confident that they will not forget their lessons in using Line and hopefully we can incorporate Line into the projects that we do with Shape in our next unit!


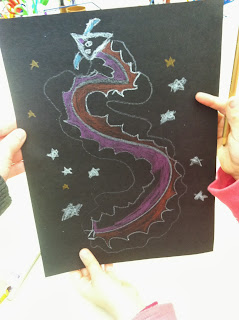
For our last Line hurrah in first grade, we made Line Dragons. The kids got so imaginative with these dragons, it was cool to see the different lines they used and also the different features they added to their dragons.


Students were given a black piece of paper with a white squiggle line already drawn down the middle for them. We spent a wee bit of time talking about Lines for review but then we moved right into drawing! Students picked a Line to use and followed the curve or their squiggly line with their Line on both sides, creating the body of their dragon. They used a white crayon to do this.
Then students colored the dragons body in with metallic colored pencils. And then they added whatever features they wanted to their dragons; wings, fire, stars, a moon, claws, horns, teeth... You name it, they did it!


Although this project was so simple, the kids really got excited about it and we were able add another layer to our discussion about the importance of Line in artwork. Using Line isn't just about drawing a bumpy line or a zig-zag line, it's about using line to create shapes and other images in your artwork. I think they're getting the connection!


Also the art room is putting out a monthly newsletter (at the end of the month since I had a hard time getting going at first!). This is to keep parents up to date about what their kids are being taught and to make them aware of the art room and it's importance. The document is pretty simple but hopefully effective! Take a peak...  Art Room Newsletter


Monday, September 23, 2013

Lines, Lines, and More Lines!!

All the grades begin the year talking about line. When talking about fundamental elements of creating art, line is about as basic as you can get! The lessons on line range in difficulty from just making single strips on line (Kindergarten), to using line to create a paper sculpture with one-point perspective (4th Grade). For this post, I wanted to highlight the second grade project. We talked about contour line and making that line continuous. We made it into a game where we tried so hard not to pick up our markers! At first kids were being silly, but after we practiced a couple of times, it was amazing to see what students observed and were able to draw! I have such good observers in second grade! To warm up we practiced drawing items in the classroom using continuous contour lines.

Then we went outside and did two drawings of three different plants also using continuous contour lines. Students chose their favorite of the two drawings.


After students made a selection, I drew two circles on their work in interesting places; one large and one small. We talked about coloring in those circles because they were our special 'color circles'. The colors of the plants and the backgrounds were only visible in those circles. The students were allowed to use whatever colors they wanted and some of the pieces are quite colorful. We spent some time talking about using colored pencils and how going over an area more than one time would give them a nice dark color.


Finally I had students tell me how to crop their picture. I cut off those areas using the paper cutter (I cut not the students!). This was a beginning of thinking about composition for them (we'll come back to that later) Overall I think it turned out well and I'm excited that the kids are already establishing good observation skills this early in the year. It's definitely something they will be using all year in art!