Friday, December 19, 2014

Feelings and Color

In our art curriculum, we are required to talk about showing feeling through color. I love this concept! The kids really latch onto it and it makes sense to them. For this project, we had a conversation about how different colors can make you feel or how we associated different colors with different feelings. We made sure to talk about how people can think about colors differently and perhaps some colors can show more than one feeling. Then I showed them examples of paintings of musical instruments. We followed that up with some good old graphite drawing! Pictures of musical instruments were passed out and students picked one to use as inspiration for their drawing.


As you can see, we have some amazing artists in our fourth grade classes! Then we moved on to the part of the project that I think makes it so interesting and exciting for kids. The students had to pick out a song, any song as long as it was school appropriate. Then they listened to it and decided what feelings the song made them feel. I had the kids do this as homework, I didn't want to have to listen to all those songs!
The kids came back with songs and the feelings that those songs inspired and we worked through what colors they should use. They loved this process, they were so geeked to choose a song and decided how to represent the feelings with color.

We broke out the watercolor paints and got to work after a brief talk about where to place color so that they instrument didn't become part of the background and it was really the focal point, and stood out, etc...


Most students finished the background in the first class, some even finished the background and the instrument. For those that had both done, the next step was to highlight the instrument even more. We used oil pastels on the instrument only, to make it pop out of the background. We talked about many ways to do that (coloring it all in, using designs and patterns, outlining etc..) 
What I like most about the finished products is that the effects are so varied, but you can tell that there is real feeling behind the colors and the way these pieces were painted.


Wednesday, December 3, 2014

Grading and Showing Growth in the Art Room

Showing growth in our students has become a huge part of my job as a teacher. Sometimes in an art classroom environment, it's hard to show a student's growth. In other classes a before and after test is done, and I have done that in the past. It shows a student's understanding of concepts or facts, but it doesn't measure their growth in relation to the skills that they are learning. Another age-old debate is how to grade artwork, especially at an elementary level.

This year I decided to do things a little bit differently. Last year, I received a lot of confrontation from parents when grade cards came out. And because I didn't have specific documentation of how I graded the students artwork, I ran into some problems. So this year, I decided to be very specific and very proactive.

In order to show growth, I selected a sampling of students to monitor for the entire year. Basically I made a Digital Portfolio for each student, with images of each project they did throughout the year, in order. This way I can see if the student's skills are improving and if they're using more skills as they progress. To keep a Digital Portfolio for every single student I teach, would be just crazy. So I selected two students from each grade; a high performing student and a low performing student. Each student has a folder on my Google drive in which I keep their artwork photos, in order of completion. I photograph them immediately when they're done.

I also wanted to show growth in my student's thought process when it came to creating artwork. I decided to have my kids write artist or process statements for some of their work throughout the year. I'm only doing this with the upper grades (3-5). Again, I chose a high performer and low performer for each grade and I am documenting their progress by keep photographs of their writing and artwork that they are writing about. An example would look like this:


Lastly, I have to give grades for each student three times a year in their report cards. I give grades based on skills or concepts learned, participation and effort, and behavior in my classroom. The skills and concepts grade I give based on how I grade their artwork. I grade each piece of artwork using a little code that I made up; each student receives a number and then a letter code to remind me why I gave them that particular number. These grades are just for my records, I keep them in a spread sheet on Google docs. I don't publish them to parents, but they are there if I have a parent call and I need to back up the grade I gave their child. Here's the code I use:

1Demonstrates complete understanding of concept, work is neat and completely finished.
2Demonstrates partial understanding of concept/work is mostly neat and/or completely finished.
3Does not demonstrate understanding of concept, and/or work is sloppy, and/or unfinished.
UFUnfinished
SSloppy
NDNot demonstrating concept
MMisuse materials

To grade a student's participation and behavior, I use an online program called Class Charts. It's similar to Class Dojo, but it's free. Every day I log on and make a positive comment or a negative comment for each child's behavior for that class. Every couple of weeks, I read through the data and contact the parents of students that are getting a lot of negative marks. When I sit down to make report cards, this program is really nice because it provides you with graphs and charts to show you how a student's behavior has been through the term. Check it out here!

So that's what I'm doing this year, I like the amount of information I have to use. However, I think the system might be a bit clunky. I hope to streamline it in the years to come. I've looked into Artsonia, as a great way to keep digital portfolios for every student and show parents artwork as well. But I just don't have time to take everyone's picture right.

Does anyone else have a system they'd like to share? Ideas? Thoughts? I'd love to hear what you think!


Tuesday, November 25, 2014

DIY Ugly Dolls- 4th Grade Art Project

Hey all:
I got the flu! It was a nasty strain, viral of course, so nothing to do but suffer through it. I missed many days of teaching, but now I am back at it and I wanted to update the rest of you on our 4th grade Ugly Dolls project. These are so great and the kids are loving them. We sewed each piece, right sides together, and then turned them inside out. Now we're stuffing them and sewing them up, take a look at the cuteness!


Wednesday, November 5, 2014

Adaptive Art Project

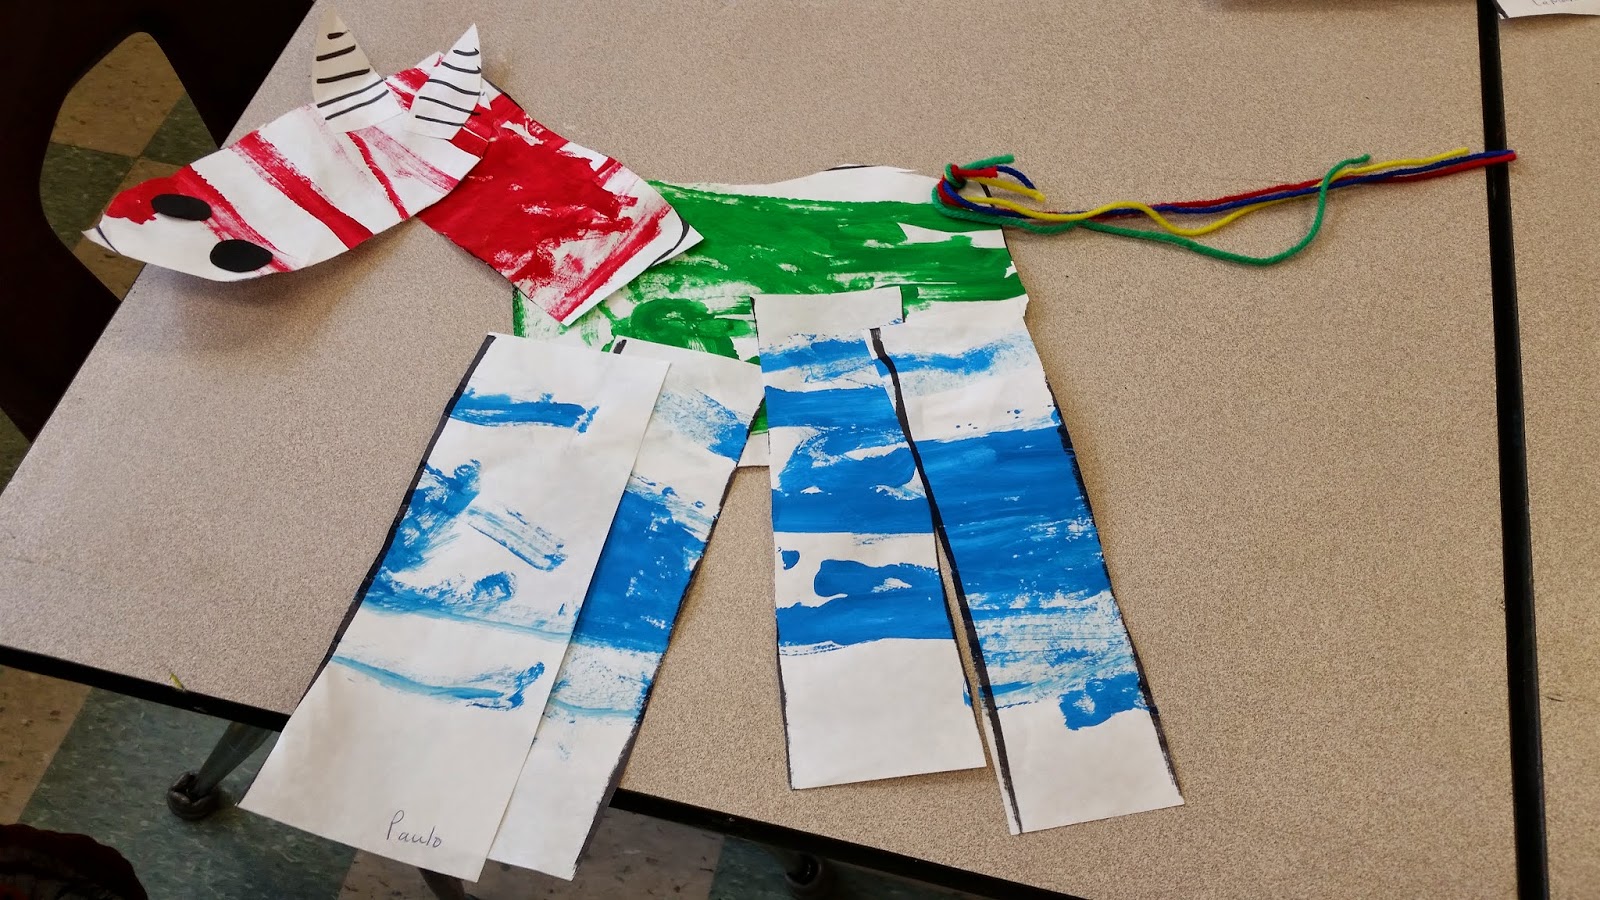
For this post, I wanted to share a project I am doing with my CI and ASD classes. I have experience working with special education students before, but in my new school, I have a class of 13 Cognitively Impaired students and also a smaller class of Autism Spectrum Disorder. This is the first time I've really had to get down and dirty with planning for students who have special needs. We started with a lot of cutting and pasting, my goal is to have students really work on those fine motors skills that they are struggling to develop. These skills are necessary for life as well as art class.
After students improved at cutting and pasting, we added painting to our projects. Now students paint and then use their painted paper to cut and paste and create a piece of artwork. The project below was focused on getting students to control their brush enough to paint straight lines across the page.

During the first class, we talked about all the painting we had done. I chatted with students about how we were going to be painting lines. We all practiced moving our arms in a line in the air and then with an empty paint brush over the table so that students had the correct motion down. Then students were given a piece of white paper and red paint only. They painted lines across the paper just using red paint. Then they put their paint brushes into water and got a new paint brush, a new piece of paper and some green paint on their paint tray. Make sure to pass out the paint brushes last so that they don't put them in the red paint on accident. Lastly, give them a new paint brush, blue paint and a new piece of paper. If you have some students who are more advanced, you can have them paint stripes with two different colors for each paper and use a pattern as seen in the first picture below.

For the next class, pre drawn legs, body, neck, and head on to the different striped paper. Now students can begin class by cutting out each piece. Have the students make a pile of their pieces as they cut. After all the pieces are cut out, have glue handy to allow the students to glue the pieces together. I used the glue to dot things and make it easier for the students.

Lastly, and this can be done during the second class as well, I had students glue on small black circles and blacked striped ears that I cut out before hand.

The students loved this project and they turned out awesome! I added a hole punched, yarn tail on each one after the second class was over. I think this project was great for building fine motor skills and helping students to paint in a controlled way. I love how much the students are improving and learning new skills!


Thursday, October 23, 2014

DIY Ugly Doll and an Update on Some Projects

Hello all!
I think I've finally changed my name with every known institution in the universe. Now that I have my prep time back, I'm hoping to blog weekly again!
In this post, I want to post a quick update on the latest kinder project and then talk about how we're doing a sewing project with the 4th graders! We're all making our own Ugly Dolls!! Which are so stinking amazing and we've just started. Okay but before I start gushing about that...

The Kinders! When I last posted, they were working on drawing faces using their knowledge of line and shape. We used pencil first and then traced over it with black marker. We had a chat about facial expressions and each student picked a different expression to use. Here are what they looked like before we colored them:


After that, we got out the oil pastels and talked about the correct way to use them. We also discussed how we wanted to be sure to get the right color before we started coloring, especially when coloring the face! We came up with a neat trick of testing the color on the back of the paper to make sure it was the right one. I had them color the whole thing; skin, hair, eyes, shirt, and background. They turned out so awesome and expressive! Check them out!


Now on to the very exciting 4th grade sewing projects. Ugly Dolls were designed by David Horvath and his wife Sun-Min Kim.to see their homepage, click here. What I love most about the Ugly Dolls is the message they preach which is: "...we should be celebrating that which makes us different, never hiding the twists or turns which make us who we are, inside and out." What a great message for our kids!!!

We started by looking at examples and then we went to work drawing a pattern for our own Ugly Doll using construction paper. Students were encouraged to be creative. But I also warned them that very tiny appendages etc. would be hard to cut out and sew and maybe they would want to stay away from them. The pattern was then cut out and pinned to a piece of felt that the student chose. They traced around their pattern with a pencil and then came back to me to have the pattern moved so that the could trace it again. They cut those identically shapes out to make the back and front of their Ugly Doll!


Now we're working on attaching any features or accessories to the front side of the Ugly Doll. Although it's taking them awhile to figure it out, the kids love working with their hands and creating something like this. Look at how awesome they look so far and we've just started! Stay tuned for more updates!


Thursday, October 9, 2014

Update on the Art Room and a Wedding!

That's right folks! I got married! Sorry sorry for the lapse in posting that has been going on for awhile. But I just got bogged down in trying to move and then finish planning the wedding and then actually get married! All while only taking a two day break from teaching all my little angels how to make art!

So here's an engagement pic for you all :) Awwww!


And here's an update on what's been happening in the art room!

Kindergarten students are learning about shapes and using them to help draw pictures. We just finished a series of observational drawings using block towers to inspire us. Now they have started on drawing faces using simple shapes. It's been a ton of fun!


1st Grade students have been painting away. We're making a 3-D color wheel! All we have are stacks of painted plates. More to come soon hopefully!


2nd Grade has been working on drawing self-portraits using a picture reference. We've been focusing on using basic shapes to help us start drawings and using symmetry to give us clues for drawing our faces. I have used this project before, but it works well, helping the students to be good observers.


3rd Grade students finished a Landscape project, using two different landscapes. We then cut them up and attached them to an accordion paper. This allows the viewer to see two different Landscapes depending on how they stand when they view the piece. Now students have begun a fruit drawing, They will be painting them next week using Complementary Colors.


4th Grade students finished their Contour Line Self- Portraits and are now working on a Pop Art piece using Grumpy Cat and Analogous Colors. I've also done this project before, but it's a good one.


And lastly, 5th Grade students finished up their shaded crayons, and are beginning on a painting using Aerial Perspective to show depth.


Tuesday, September 16, 2014

Art Room at the Beginning of the Year.

So we've really dug into the first couple of weeks of the year and the kids are already working hard to complete their first art projects. It's a time that's full of experiments, both on the part of the students and their artwork and for me as a teacher. I'm learning the personalities of the students and the classes and deciding what will work with each one. It's a stressful time, but also exciting!
I'm especially proud of the 4th and 5th graders who have started the year learning about, and creating projects using some tough stuff. Shading and contour lines. With the 4th graders, we're even trying Continuous Contour Lines! Here's what they've accomplished so far:

4th grade is working on Contour Lines, We learned about how to draw using Contour Lines. We chatted about going slowly, following the line with our eyes as if we were ants crawling, going along the outline, and even trying not the lift our pens! (Check out the video I used to show this, I didn't use it all, but it was neat for them to see) Then we practiced doing a Contour Line drawing of our hands. They were frustrated that their hands didn't 'look right', but it was a good exercise in slowing down and taking our time.


In our next class, I showed them our finished project, which is taking a picture of each student and placing a transparency sheet on top of it so that students can use a Sharpie marker to trace the contours of their face. We also worked on colorful backgrounds to accompany the transparencies when it's all done. Next week we will attach the two and mount it on black paper. I'm excited for this project because it's easy, but they learn a lot and it looks cool! (Inspiration for this project comes from here)


Next, the 5th graders, who have been learning all about shading. We discussed what shading is and why we use it. We came to the general conclusion that we use shading to make objects that are on a 2-D surface appear to be 3-D and realistic. We practiced a bit and then dove right into using oil pastels to shade crayons on black paper. (we traced the crayons the day before we started using oil pastels.) So far so good, although nice and messy so watch out! (inspiration for this project can be found here)